Showing posts with label tags. Show all posts

7.28.2009

Two-fer Tuesday...

Tonight I've got a cute little tag & another last-summer catalogue card submission to show you!

First up, a Just Because Genevieve card:) I was so sad when we were told that this paper line was discontinued... it is SO pretty... I have been hoarding every little scrap of it.

I'm not overly thrilled with this card, but it does show off that yummy paper :)

Stamps: Tag Tidbits, All Occasion Circles, Floral Dingbats (retired)

Paper: Amberley Grace Cardstock, Genevieve
(retired)

Ink: Violete & Landscape Palettes (I think!)
Other: Willoughby Ribbon, Extra Jumbo & Super Jumbo Flower Punches, circle punches, foam tape

Next up, this cute little tag! Actually, it's a pretty big tag... it started as a card, but ended up a tag... who knew :)

The background is another that I had demo'd at one of my Hostess classes. It uses a brayer, Kaleidacolor pad, water mister & Oxi-clean granules. Salt creates a similar effect, so you could use it in a pinch... get it... pinch of salt... I know, "what a goober".

Stamps: Skinny Birds, Great Greetings

Paper: Glossy & White UltraSmooth cardstocks, Mulberry Meadow cardstock (retired)

Ink: Noir Palette, Autumn Leaves Kaleidacolor Pad

Other: Stardust clear glitter gel pen, Grey Tombow marker, In Bloom & Elizabeth Blossoms & Buttons, Prismacolors w/ mineral oil, misc. rick-rac, Yellow Scrapper's Floss

What do you think?

6.02.2009

A little Art Share...

No card tonight! Instead, I'm going to show one of my Art Share projects. I made this little Mini-Meander book for a fellow Angel Angela. I felt the colors were totally 'her'... and I've never even met her IRL :)


I took a ton of photos, so I thought a slide show would be easier to view. I know that sometimes they don't show up in blog-readers, so you should be able to click 'view all images' and it will take you to a gallery.


Stamps: Memo Fun, Creative Inspiration, Script Background, Artsy Elements
(retiring this month!)

Paper: Mimi SWIC, Bazzill Mono Blue-greens & Mono Pinks

Ink: New Canvas, Belle Rose, Water Lily Green & Bordeaux Palettes, VersaMark

Other: Audrey Embellishment Jar, Lemonade Blossoms & Buttons, White & Pink Scrapper's Floss, misc. book binding tape, ribbons & rhinestones


I love the button-in-a-button on the front, and all of the interactivity to the meander in general. This one was created so that Angela could add photos & journaling of what inspires her. After she completes the blank pages, and she needs a little sumpin' sumpin' to get the creativity goin', all she needs to do is thumb through it! Enjoy, Angela!!!


What do you think?


4.28.2009

Ummmmm... hello?

I know I know... bad blogger. It's been crazy around here, so I won't be posting again until Friday or Saturday! I haven't been working on anything, so there's nothing really to post anyway :( All I have for you today is this "Goin' Green" recycled tag project that was done for Paper Wings:

The white border is a left-over from another card I had started. I had punched the center out and was left with this lovely square frame and HAD to use it. TAC's plastic clamshells that they ship their stamps in are so perfect for recycling by using the Big Shot and a Sizzix tag die. I applied a bit of acrylic paint to one side for texture.

The sentiment is layered and pop up with a pop dot, and the white mat was glued to the back side to hide pop dot. I used a bit of an old cotton pillowcase for the tag tie and ran it over the ink pad for color.

Stamps: Summer Elegance(retiring!!), Tag Tidbits
Inks: Belle Rose & Noir Palettes
Paper: Uptown Girl, misc. black & white cardstocks
Other: clear tag, cotton trim, paint, staple, pop dot
Sorry kids, that's it. I'm hoping to have some creative time Friday night {crossed fingers}!
What do you think?
.

4.24.2009

That's so sweet... I think I'm gonna hurl...


Happy Friday!! I want to share an anniversary card that I made for our neighbor across the street. Brian came over last weekend with this tag-shaped card... he said that he had dug around in his wife's (Cheryl) supplies and started to make her a card! How sweet is that?!
{ try to contain upchuck reflex :) }
Anyway, Brian said that he went through a bit of her papers and supplies & tossed them out before he gave up and asked me to finish it for him :) On the inside, Brian had attached a copy of their wedding photo (15 years!) and a typed letter to Cheryl... I didn't read it, but I'm sure it was absolutely sweet! He had matted the black/white photo with an aqua blue cardstock, so that's what I worked with on the outside.

Other: Angelee Ribbon, Turquoise & Tan Scrapper's Floss, Swimming Pool Posies, misc. button & flower, pre-made tag card, foam tape

I really like how it turned out! And here's a tip for getting nice and soft ink edging that I picked up from a fellow Angel, Beverly ... cotton pads that manicurists use! They are flat cotton discs with a mylar-type flap on the back that you can grip... and you don't even get messy fingers (on one hand, anyway!). I used a Sharpie fine tip marker and wrote the name of the ink used and store them in a big ziploc bag... this way I don't mix inks on the pads. AWESOME tool... thanks, Beverly!!

I don't think MY husband would ever try to make me a card... maybe that should be another challenge! LOL! See how many wives can get their hubbies to make a card... I wanna see some posts, ladies!!

What do you think?!
.

4.09.2009

Love and other stuff...

Ack! I know... I know... I am blog-slacking big time. But I've been going crazy with my Heidi... poor fur-baby... she had another eye surgery. I am a mess... I can't even imagine what it would by like to have human children. I do know that Heidi's college fund has been steadily going to the vet & ophathamologist in large amounts. I could kick myself for not getting pet insurance a couple of years ago.

So enough with the home life, and on to a little more love... yep, another installment for the Paper Wings Music of my Heart theme. First up...

Light My Fire Candle Tin
What better sentiment for a candle, right? :) I drew the heart on chipboard & then covered w/ cardstock before cutting out... I covered the chipboard flower w/ Uptown paper. I sponged all edges w/ Moulin Rouge (including the back of the chipboard elements).

I also sprayed the scarlet elements and back of chipboard w/ Silver Glimmer Mist. I thought the leaf image looked like a stylized flame, so I stamped that on another piece of Uptown paper. The tag sentiment is handwritten: "C'mon baby light my fire!"... thank you, The Doors :)

Stamps: Bold Flourishes
Paper: Uptown Girl, Cha Cha SWIC tag, Mono-Pinks Bazzill (tag), Scarlet cardstock
Inks: Moulin Rouge & Noir Palettes
Accessories: misc. ribbon, chipboard flower & heart, Micron journaling pen

Just a Love Note
The main image is supposed to look like a music note... I think it worked...

Stamps: Love Doodles, Punctuation, Trendy Greetings, Life is Short (little love sentiment), So Splattered (retired)
Paper: Scarlett & Black cardstock, White UltraSmooth
Inks: Moulin Rouge & Noir Palettes
Accessories: Tombow red marker, misc. ribbon
What do you think?!

.

3.10.2009

Pemberley Bay Matchbook Album...

Woo Hoo! Finally finished the Pemberley Bay Matchbook Kit that TAC gave us in San Antonio! I hadn't done much there because I was going on very little sleep (oh the fun we have) and just couldn't focus. I followed their directions for a few pages, but decided to just wing the rest (hence the "co-design" photo watermarks). I'm doing another slide show... do these work well for you guys? It's so much easier than posting a dozen photos! Just click on "view all images" for a larger lookie-see :)

Stamps: Interact
Kits/Paper: Pemberley Bay Matchbook Kit, Amberley Grace SWIC, Amberley Grace & Hemingway Cardstocks, misc. shipping tags & large coin envelope
I've also done the Rockin' Roxie Matchbook Kit... I'm waiting for the sun to come out so I can photograph it. I actually completed it before the Pemberley Bay one, so I picked up a few tips:
1. Use foam tape (or similar) as spacers at the binding area... this allows for a more level look to album, especially when closed.

2. When using popped-up elements (or buttons in the case of RR), try to spread them out in different areas on different pages... don't just put them all at the 'open end' of the page. If not, it leads to an uneven look when closed.

3. Be careful when letting elements hang off the ends of the pages... top & bottom are fine, and you can do a teensie bit on the end (just not-so-much).

4. Be sure to do a 'dry run' with your pockets & tags... a couple of pages I did just use the photo mat as a pocket, and it really needed a bit of a gusset.

5. On the page with the triangle loop, eyelet & ribbon, I created a pocket with the AG paper by running strips of foam tape around three sides. This allowed plenty of room for a few tags and gives more dimension to the page.

My favorite page? I love the cover & binding, and all of the interactive pages, and the cool fancy frame page with the acetate window, and the foam tape pocket page... wait... did I just name every freakin' page?! ;)

By the way, I still have several tabs, photo corners, and two whole pages left over from the kit... hmmmm... what to make next...


What do you think?

Edited to add: TAC had pre-cut the fancy frame shapes with a die cutting system they had at the home office. I really like that shape, don't you? They provided everything except the stamp set, ink, the sheer binding ribbon, acetate, staples, foam tape, and some of the floss... pretty generous I think... it's great to be an Angel, huh?! :)
.

3.05.2009

Lilly Flower Ribbon Book...

Well, I didn't finish it, but I'm going to share what I have so far ;)

First, the Frugal Find: one of my local Hobby Lobby's, in the fabric & trims department, carries bags of misc. ribbon for $1.99 (or $2.99?). In each bag there are 15 different ribbons with 2 yds. of each kind... 30 yards of ribbon for a couple of bucks! And almost all of it (in the two that I bought) is extra wide (1" or larger). And one was this 5" wide white satin!

[is it still considered ribbon if it is THAT freakin' wide?]

Anyway, I decided that it would make a beautiful little album/ journal cover! I took a bunch of pictures, so I decided to make a slide show for easy viewing. (You can click on "view all images" to view larger photos)


Other: Scor-Pal, Crop-a-dile Big Bite, Bazzill Bitty Blossoms, Icicle Stickles, Juliette Ribbon, Mimi Ribbon, Extra Jumbo Flower Punch, WeR large green eyelets, misc. ribbon, staples, & sewing machine

I folded it over on both ends and, using my Janome mini sewing machine, double-stitched the flaps to secure and also to create a decorative binding. I did all of my stamping and heat-set it, and punched holes and set the eyelets. I scored my cardstock pages to fit within the cover binding and punched holes through both.
I used the Juliette dark pink ribbon to lace in-and-out through the binding. I then took smaller pieces of the same ribbon and knotted the blossoms to the binding to cover the icky holes. On the inside, I took some green satin ribbon and tied a pretty knot.

I knotted a piece of pink ribbon and ran it from the back through to the front cover as a closure... it holds it closed without having to tie a bow or knot it at the front! I Stickled portions of the butterfly and the centers of the medallions on the front cover.

I started to work on the inside pages, but I just wasn't feelin' it late last night. I do like the first page (the pocket & tags one), but the others I'm not-so-thrilled with... we'll see when inspiration hits again. :)

What do you think?
.

2.27.2009

Rustic Double Journaling Pocket

Happy Friday! You have to love Kansas weather: 68 on Wednesday, warm Thursday morning and then cooling off, and sunny but cold today. And, yes, it is supposed to snow tonight. Good grief.

A little bit of news... I'll be a vendor at the ERC 2009 Spring Benefit Crop & Shop in Topeka on March 21st. The crop was immediately sold out, but all of the vendor booths will be open to the public for shopping! There will be many different types of vendors in addition to stamping/scrapping booths; here is a link to the list of vendors (they are also linked) in case you are interested, click here. I'll have several project kits made up, along with tons of TAC paper & cardstock packs, TAC kits, embellishments, Stickles, ribbon... on and on!

So I thought I'd share some of the classes I will be teaching the croppers. The first one will be the Mini-Meander Album that you've seen before, but using different TAC paper collections. The second one is the one I'm sharing today...

Rustic Chic Double Journaling Pocket

I really like how this turned out. It shows how versatile one pocket element can be... I've shown it on a 6x9 scrapbook page as well as a gift card holder (see below). This photo shows what we will be making in the actual class, and then the attendees can decide later how they want to use it!

Stamps: Memo Fun, Mini-Bet, Creative Inspiration (dotted star), Interact, Trendy Greetings (happy b-day)
Paper: Rustic Chic, Bazzill Mono-Reds & kraft cardstock, DCWV brown cardstock
Other: Scor-Pal, sanding block, pop dots, misc. ribbon, CutterBee Bug piercer

I think the red/pink/brown color combo works for the Thor page, even though he is a boy... it doesn't come off too feminine. The dark brown and rustic feel to the paper combined with the distressing and grunginess reads as boy (to me anyway). By the way... isn't he cute?!!

You can create a double pocket by simply omitting the glue on the top edge of the pocket... two journaling tags for the price of one!! The left tag could also be used for an additional photo mat in-lieu-of journaling.

For the gift card holder, I used my original pocket design, which is a bit shorter than the others. It really should be about 3/8" wider to conceal the gift card better, but I actually like how the red on the card balances the red/pink of the designer paper.

The star was stamped and then cut out and popped up on a pop dot... just a tiny detail that really adds something to an element.

What do you think?

2.07.2009

Dusting, chalk, and a little missing mojo...

Ahhhhh... Saturday night... and I'm at home :) I just finished cleaning up the house, and Poot has agreed to mop the floors!! OMG... I know! I'll wait for you to pick yourself up off the floor...
...
...
I've been cleaning all weekend, and I even took everything off of all the shelves in my studio and dusted, vacuumed, and re-arranged! Oh... I'll wait again... :)
...
...
THAT took for freakin' evah!! I HATE dusting. It always seems to settle again in 5 minutes and doesn't look like you did anything... maybe it wouldn't do that if I dusted every other day? :)
On to the fun stuff! I so enjoyed the shoebox swaps we did in S.A. This big tag was cased off of a card that Barbara Crooks created for the swap.

I loved how she popped the sunflower up using Tutti Fruitti paper, as well as, how cute the image is when using the Jewel Tone Pearlescent Chalk set. The little girl image is from Fall Harvest from TAC's Fall Supplement, and the sentiment is from a Level A Hostess set Feel Better, and both were stamped with Noir Palette.

I feel as though my mojo has been missing as of late. Check out this card. I'm just not feelin' it. I tried introducing another color with the purple & orange and nothing was jiving. So I finished it and immediately put it away. Far away.

So it won't be staring at me...

mocking me.

Other: Orange Peel Stickles, Pop Dots, hole punch

What do you think about these?

12.23.2008

Recycle...

A lot of the TAC Angels have been trying to come up with more and more clever ways to recycle & re-use the plastic clamshell packaging in which our rubber stamps are shipped. Heather, Diana and so many others have come up with some fantastic ideas... thanks, ladies! But there are only so many of certain projects you can give away and sell, and you are still left with more packaging. So, for the past year or so, I have been building my stash of clear die cuts created from the clamshells with my Big Shot and Sizzix dies. I've got shapes, tags, flowers, and now, snowflakes. I LOVE the look of these babies.

I created a large clear tag for a baby gift: with just a small piece of white cardstock with a sentiment, backed by a scallop border, and a flourish stamped in StazOn on the rest of it. Clean, simple, and elegant (no, I didn't get a picture... sorry). But I did get these pictures of the last two Holiday cards I made this season! The plastic clamshells that I was working with were on the smaller side, so I didn't get the entire snowflake cut... which was perfect, since I only needed half of one for this design anyway.

Stamps: Just for You (current hostess set), Simply Christmas, Tag Tidbits
Paper: Bazzill Mono-Blues & Bazzill Basics cardstock
Ink: Starry Night & Seascape Palettes, VersaMark (w/ Silver EP), MM Spotlight Paint
Other: Winchester Hardware, Blue Scrapper's Floss, misc. ribbon

I used a sponge brush and swabbed a bit of MM white paint to make the clear snowflake stand out a bit off of the navy background. You can't tell from the photos very well, but there is also a small stamped snowflake border along the light blue cardstock strip with Stickles at the centers. The large sentiment was heat embossed in silver, and the small sentiment was stamped onto a frosted acrylic tag with Palette ink and tied to the ribbon w/ Scrapper's Floss.

Please post a comment with links to your recycled clamshell projects... we love more options!!

This is so much prettier in real life. You'll just have to trust me. :)


What do you think?

11.11.2008

OMG... Barb's in the kitchen... almost cooking... gasp!

Hello, hello [que music from the movie Party Girl, and Parker Posey sashaying across the room] ... I don't know what just made me think of that, but there ya' go.

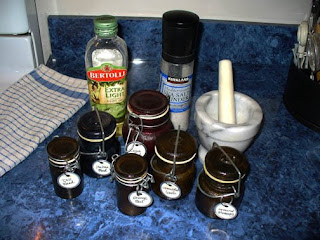
Awhile back, when I showed a little hang tag, several people emailed me for my seasoned olive oil recipe. So, without further ado, let us enter Chez Barb (Seleise, did I spell that right?).

Disclaimer #1: please don't laugh at the horrible blue faux marble laminate countertops... they were here when we bought the house, and we just haven't had the cash to replace them!!

Disclaimer #2: typically I don't measure anything, so tonight I tried to for you! I usually just keep adding herbs until it 'looks right' [yeah, whatever THAT is] and move on!

Disclaimer #3: I am not a chef, nor do I pretend to be one :) ... I just make what I like. This is a VERY HEAVILY SEASONED oil. You could probably use the same amount of oil and cut the herbs in half and it would STILL be yummy! The herbs settle at the bottom of the container, so shake well prior to each use.

Disclaimer #4: the photos are not very good, but it is a winter evening and the lighting sucks, so I'm sorry they're not pretty.


Barb Foster's Seasoned Olive Oil:
2 tbs. granulated garlic
1½ tbs. Italian blend seasoning
1 tbs. chives
1 tsp. ground rosemary
1 tsp. dill weed
1 tsp. Cajun blend seasoning
¼ tsp. orange peel
½ tsp. sea salt
4 cups extra light tasting olive oil

containers of your choice

You'll notice that I cheat by using some pre-blended herbs. I love these blends and it cuts down on space in the cupboard. I don't have a specific brand I use, just as long as the label says 'Italian blend' and 'Cajun blend'. I place all of the herbs and spices in my mortar and grind away.

[grind the Italian blend first since it is very woody... and even then you won't get a fine powder, but it releases a fantastic aroma]

I picked up these inexpensive glass containers at Wal-mart and sanitized them. I divided the herb mixture among them and filled the containers about half way with oil.

[ I couldn't find my funnel, so I improvised by using a tip from the Pampered Chef Easy Accent Decorator... worked like a charm :) ]

I then vigorously shake the container to mix everything well. I finish pouring in the rest of the oil, give 'em another couple of shakes, and VOILA...

Barb's Seasoned Olive Oil. This oil is great for dipping bread and makes a GREAT Pasta Toss when paired with some shredded Parmesan cheese (yummy).

Here is a shot with the tag, but for my holiday gift-giving, I'm going to do a much snazzier label and tag with more of a wintery feel.


So, what do you think?