Showing posts with label Fall. Show all posts

11.06.2013

HDH179 - Samhain Sunset challenge

So how was everyone's Hallowe'en holiday?!  I hope it was delightfully dark and macabre ;)  Mine was pretty quiet... stayed home to hand out goodies to all of the little demons about.  I ran out of candy around 7:30pm... WTF?!  Didn't we used to stay out until like 9 or something?  They started around 5pm, which is way too early in my opinion.  What IS trick or treating etiquette?  Oh well.  
I watched a few scary movies while all of the candles in the house were lit... it was quite delightful.

I've got photos of the house, but that will be another post ;)

Sooooooooo, back to a little bit of papercrafting goodness... over at Haunted Design House, we are having our LAST challenge of the year, which expires this Sunday at 5pm CST.  The Minions are in need of a little yard time from the dungeon, but will pop in now and again to keep everyone on their toes.
So, what is the challenge?


Macabre Monday challenge,
"Samhain Sunset."
You are to create a dark, Gothic, or Hallowe'en
based art piece that represents a 
Samhain Sunset.
We're looking for the colors of a beautiful fall sunset.
Think purples, reds, oranges, and yellows.
Use them as you wish, just keep it within our guidelines.

We are sponsored by the incredibly talented Mitzi Sato-Wiuff, of 
She has offered up a very generous prize of $15 worth of digis (digis ONLY)
to each of our GTs this challenge.

Enter your sunset project here.


Mitzi does some AMAZING artwork and digital stamps!  There are so many beautiful images with which to work, I had a reeeeeally hard time deciding!  I went with her


Isn't she gorgeous?!  And I only used a portion of this beautiful image!  Be sure to check out the whole image... seriously awesome!


Shades of orange and copper have always been favorite colors of mine, so this challenge was right up my alley.  I tried to create an ombre effect with the tones in her hair and wings from dark to bright, but the photos look a bit washed out... sorry.


The patterned paper is from Memory Box (I think.... Nightfall or something?).  And I used a TON of different Copic colors on the hair and wings... seriously.  I think I'll be adding a bit o' Stickles to the dots and parts of her wings... she needs some glitz, me thinks :)

Don't forget to enter the challenge... who wouldn't want to win some of these amazing images?!


What do you think?

11.16.2010

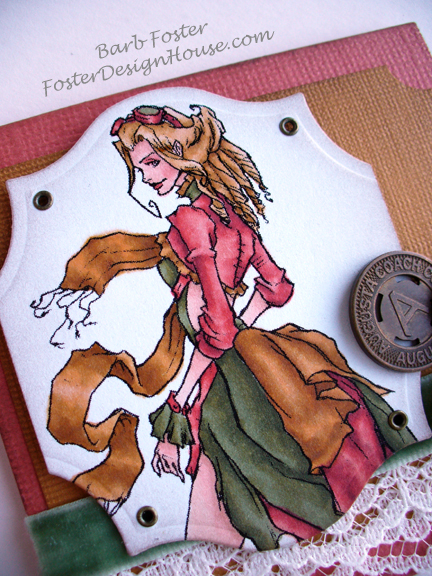
Steampunk Annie & a CARDS blog challenge...

Hello again my friends!  Today I wanted to share a mini-card... the challenge came from the CARDS blog.  Just click the link to find out the details :)


I love mini-cards... they do not have a lot of 'real estate' with which to work, so the challenge comes from trying to foof up a pretty small canvas :)  I worked with one of the new Steampunk Gang digis from Simply Betty Stamps... LOVE them!  She commissioned a new artist that has such a wonderful style.


I chose salmon, olive & mustard as a color palette, which I think compliments the image very well.  I added lace & velvet trims along with the metal elements to add to the whole vintage steampunk genre.
I packed this little 3x3 card with quite a bit of punch, no?


Digi:  Steampunk Annie (Simply Betty Stamps)
Paper:  Bazzill & Caboodles white cardstock
Ink:  Burnt Umber Palette
Other:  MM mini-eyelets & oval pearl, Nesties, misc. lace & velvet trims, metal findings, foam tape
Copics:  E000, E00, E01, R02, R05, R08, YG93, YG95, YG97, YR20, YR21, YR23, YR24

What do you think?

11.06.2010

Wow...

... just sayin'.  It's been a whole month since I've posted on this blog!  At least I have a good excuse... October is OBVIOUSLY reserved for all things creepy, and therefore I was posting more on my HauntedDesignHouse blog :)  But now that THE BEST HOLIDAY EVER is now over for the year, I guess it is time to start doing a little sumpin' sumpin' over here ;)

First up, since I am sooooooooo horrible at marketing my classes, I thought I'd share what we did on November 1st at The Scrapbook Page.  These are 4 of the 5 cards we made... I was an idiot and didn't get a photo of THE BEST ONE, which was a realistic looking candle lantern image by Stampendous.  But here are the rest (sorry about the sucky photos... it was at night for the first 3):


The leaves are Tim Holtz's & the snowman is also a Stampendous.  I wonder if I can con Cameron into giving me a pic of the lantern one?  It was on this heat-embossed glittery blue/violet damask paper from Bo Bunny.  

Anyhoo... I'm actually going to post a few pics from my upcoming multi-media mini album class for November 30th, so tune in to my next post :)  But in the meantime...

What do you think?

11.22.2009

Squirrely Girl

Sorry guys... computer issues strike again... I haven't had access to mine all weekend.  I could check email from the laptop, but no photo editing, online forum discussions, google reader... nothin'!  I really didn't like it... I am such a junkie.   

Hi, my name is Barb, and I have a love/hate relationship with my computer 
{in unison "Hi, Barb"}


So, back to the good stuff for today.  I've been working on Halloween & Christmas cards year-round, so I thought it was high time to get an Autumn card in before November ends :)


Isn't she cute?  There's also an image with her & a snowman in the set that is just adorable.  I colored her with Prismacolors & mineral oil... rosey cheeks and all :)


Stamps:  Squirrely Girl, Trendy Greetings
Paper:  Penelope SWIC, Penelope, Kraft, DCWV lime green & Ivory UltraSmooth cardstocks
Ink:  Memento Cocoa
Other:  Marvy Flower punch, EK Success border punch, Scor-Bug,  misc. ribbon


What do you think?
.

11.19.2009

You are my sunshine :)

Does this just NOT make you smile?!  


That single little blue bird in the autumn tree... I'm gonna say it... FREAKIN' A-DOR-A-BLE.  I love love LOVE this TAC stamp from last year :)  I've also had this jar o' harvest colored buttons staring at me for months... I couldn't take it anymore, and the autumn button tree was born.  I've been seeing trees o' buttons all over the net and finally came up with this little bebe.


Stamps:  This Girl (sentiment), Early Bird (retired)
Paper:  Ivory UltraSmooth cardstock, kraft packing paper
Ink:  Memento Tuxedo, Burnt Umber Palette
Other:  Copic markers, brown Scrapper's Floss, Glue Dots, misc. buttons


The part that took the longest on this bad boy, was tying all of the floss to the buttons... but it looks soooooo much more finished off than if the buttons had been left plain.  Glue Dots are the BEST adhesive to hold buttons onto cardstock that I have found so far... two thumbs up {insert cheesy grin here}.


I left the card pretty plain, but I really like it.  You can't really see it, but I did a little subtle sponging with brown ink on the main panel.


What do you think?

p.s... only one more day to enter for the blog candy drawing!  Click HERE if you haven't entered yet!

.

11.10.2009

Guess Whoo....


How cute is this little bandit?  I KNOW, right?!  He is my favorite image out of that stamp set.  He just makes me giggle.

{tee hee}

see?

If he isn't an owl, I just made him one for purposes of this card :)  He's colored with Prismacolor pencils & mineral oil (yes, yes... I went back to my Prismas).


I layered Bandit up on this funky piece of... ummm... I don't know what it is.  I'm wondering if it is that stuff out of which old-school belts are made.  I am just not sure.  It came in a bag of ribbon remnants from Hobby Lobby.


Stamps:  Fall Harvest, What a Hoot
Paper:  Mulberry Meadow SWIC & cardstock (retired), White UltraSmooth, kraft & black cardstocks
Ink:  Noir Palette
Other:  funky trim, olive jewels (from Michael's)


This would make a cute "secret sister" card, or maybe a "yeah, it's been awhile and you probably don't even remember me" card ;)  Pop a santa hat on him and it would be perfect for a "secret santa" gift... ok, you would probably have to switch the colors up a bit, too :)

What do you think?
.

11.04.2009

{heavy sigh}...

It's a lovely, chilly autumn day, and as I write this, I can see orange & crimson leaves dropping from the branches with every gust of wind... sigh... I love Fall.  The crunch of the leaves underfoot, the squirrels scampering up trees & across fence tops, and the subtle scent of wood burning.  mmmmm...


Speaking of squirrels... yep... you guessed it!  Another squirrely card.  I can't help it... he is so cute.  If it is any consolation, my next post will NOT feature this little dude :)

Another VERY simple, clean layout... I do believe my WOSFF (web-o-sphere friend forever) Laurie is rubbing off on me :)


Stamps:  So Squirrely
Paper:  Penelope (orange), Kraft & DCWV lime cardstocks, Mulberry Meadow (dark green - retired) cardstock
Other:  Prismacolor pencils, Scor-Bug, BG ribbon, EK Sucess Icicle border punch, foam tape


The squirrel kinda looks like he's standing in a field of something... harvest time!  He & the sentiment are popped up on foam tape.  And he wasn't too bad to cut out... except around his feet :)


And may I say that I love love LOVE the ribbon?!  Typically I'm not a plaid girl... a little bit country-fried for me, but this one worked great.


What do you think?
.

11.02.2009

How about a little autumn-ness tonight?


Is this little squirrel cute, or what?!  My friend & fellow demo Angel, Kim Sears, was kind enough to stamp a couple of these cuties off for me a while back, and I finally used them!  These images are part of the August Stamp of the Month (which is still available online!) set, and I'm thinking I really need to buy it!  


My go-to color medium is almost always Prismacolor pencils with mineral oil... blended with artist drawing stumps.  You can find the stumps in the art department of JoAnn's, Michael's, or Hobby Lobby next to the artist charcoal pencils, etc.  Do NOT get the ones that you can 'sharpen' by unrolling the paper... get the pressed kind.  You can clean & sharpen them by running them along some sand paper or sanding block.


I've got a handy-dandy little Tupperware Smidget (about the size of a half-dollar) in which I soak a cotton ball with mineral oil.  I've tried baby oil, but for whatever reason, I just can't get it to work as well as the regular mineral oil from the pharmacy.  I can fit the Smidget, an eraser, a pencil sharpener and my blending stumps all in a $1 pencil case from JoAnn's yep, cheap & easy {no comment from the peanut gallery, please ;)}. 


Stamps:  So Squirrely
Paper:  White UltraSmooth, basic black, DCWV lime green, & Mulberry Meadow (retired) cardstocks

Other:  Giga Scallop Square Punch, BG ribbon, PTI twine, foam tape, 1/16" hole punch


I'm still trying to figure out how to work our digital camcorder so that I can start doing tutorials.  In the meantime, there is a great one on Mischelle's blog using mineral spirits... the same principles apply to the oil.  And no... it doesn't leave an oily sheen at all.


Anyway, back to squirrely...  I left the inside blank so that it could be a "whoops forgot your birthday" card or a "BIG whoops I totally screwed up... my bad... it's all my fault" card.  Not that I'm sure most of us need the latter one much, but just in case ;)

What do you think?!
.

10.18.2009

October Angel Art Blog Hop

I totally messed up and didn't create anything for a lovely October TAC Angel bloghop... I know, I know... I am a bad bad BAD Angel.  Although, I have never claimed to NOT have little red horns holding up my halo ;)   So, please go visit these lovely ladies and show them some luvin'... blog comment style.  :)

Laurie
Kim
Angela
Shirley
Julie
Jen
Trudy
Teresa
Diane
Rita W
Bridget
Jamie
Suzanne
Stacy

10.16.2009

Friday quickie...


Today I'm sharing another Scrap Pile card.  Any little bit of patterned paper or cardstock that is left over from a previous creation gets thrown in, and it just keeps getting bigger!  I do tend to search through it on new projects to see if there is "just that size" of a piece, so that's keeps the pile pared down as much as possible.  :)

Stamps:  Trendy Greetings, Goodness of God (retired)
Paper:  Willoughby SWIC & Cardstock
Ink:  Burnt Umber Palette
Other:  Mega Square & Scallop square punches, paper piercer, sponge


I created the little scallop strips by inserting a cardstock strip into only part of the punch... kinda 'up, over and down' kinda thing :)

That's it for today, peeps.  I've got that craft fair Saturday & Sunday, and we are lucky enough that we can set up tonight... this allows more sleep in the morning :)  And you know I'm all about that!  Anyway, I'm sure you won't be hearing from me for a few days, and I wish I could have shared something a little more pumped up, but thems the breaks, baby ;)


What do you think?
.

10.06.2009

Ghoulish gourds all in a row...


I thought I'd share another little treat project today.  How cute is this little row of pumpkins?!  It's very basic and super easy to make, and I'll be selling a few of these at an upcoming craft fair.  Sorry about the photos... it was cloudy when I snapped them.


I created a little accordian-folded divider so that the little guys wouldn't move around in the box.  May I just say:  the Scor-Pal makes crafty life so easy sometimes!  I created a template, however it is not to scale... but it is so seriously easy you can just line it up on the SP and go to town:


This box feels nice and sturdy because I have an extra side piece that folds over... this also creates a nice finished top edge.  I did trim a smidgen off of the outer piece that folds over and in so it would fit correctly.  The acetate lid is created with the same box bottom template, except omit the two outer 1" x 5-1/4" sections.  I just used a mini glue dot to secure each flap so that there would be minimal adhesive that would show.  You could also use an eyelet if you wanted a more polished appearance.


I wrapped the little pumpkins in food safe plastic before putting them into the box... this will keep them fresher and cardstock won't stick to them!  Supplies:  TAC's promotional stamp set More Bone Appetit, Penelope & kraft cardstocks, copper eyelet, acetate, and some paper ribbon raffia.


What do you think?!
.

8.12.2009

Hmmmm...

First things first... TAC promotion time! Surprise boxes that retail for at least $150, are only $75 AND home office has picked several random boxes and included FREE GIFT CERTIFICATES (for T-coded stamps) valued from $50-$100... this is IN ADDITION to the box contents!!! Check it:

And here's a kicker... remember that a $75 dollar box + $25 more in purchases or sales is a $100 qualifying party which equals DOUBLE HOSTESS REWARDS!!!! Or grab a buddy and split a box AND a party AND the benefits! And now, on to the card!

I don't know that I'm really feelin' this one. I started out by using Taylor's sketch TESC77. Instead of using circles, I went with rectangles... maybe that is why it isn't working. Oh well, I'm sharing it anyway :)

I do like how the squirrel is colored... I mixed my media for the image & background: Prismacolors & mineral oil for the squirrel and watercolor crayons for the background & edges. The water-coloring looks so much better for backgrounds... more even and less work :)

Stamps: So Squirrely (August SOTM!!)

Paper: Penelope SWIC, Penelope & White UltraSmooth cardstocks, kraft packing paper (scallop rectangle)

Ink: Noir Palette

Other: Penelope Ribbon, Scor-Pal, Cloud Scissors, White Scrapper's Floss, foam tape, Giga Scallop Square punch, AquaColor crayons, misc. buttons

And do you see the little purple cardstock ruffle? I procured that idea from my WOSFF (web-o-sphere-friend-forever) Laurie... thanks, Laurie :) Just glue the top of the scallop strip above the score line and poof up the bottom... so cute.

What do you think?

7.31.2009

365 Cards Day 148: Thankful Penelope

OMG... I know! Another post... the mind reels. But like I said earlier, I've been a slacker & I'm trying to make up a little :)

This is for 365 Cards' Day 148: Super Sketchy Sunday! The moment I saw this sketch I wanted to use it... it looked so fun! Then, once I actually started, it was really difficult :) I am happy to report, that I actually like how this one turned out!

I'll wait for you to pick yourself up off the floor... I know it was a shocker...

...

...

Hi! Now for the deets on this bad boy:

Stamps: Sweet Goodies, Thinking of You (new Hostess Level C!)

Paper: Penelope SWIC, basic olive cardstock, & Mulberry Meadow cardstock (retired)

Ink: Burnt Umber Palette

Other: circle punches, uber-cool orange trim from JoAnn's (frugal find!), foam tape, Coluzzle circle cutting system


The striped circle is actually one of the die-cut tags from the Penelope collection... I hid the tag hole under the olive circle... genius me thinks :) And the little paisleys? They are the cut-off strips from the Penelope sheets... yep, just one more scrap of paper to save from the trash can :)

What do you think?!

7.24.2009

I'm kinda feelin' it, kinda not...

I didn't like how this first card turned out, but I loved the coloring on the pumpkin... so I'm just showing off the pumpkin :) The rest of the card shall never be seen again {evil winkie grin}.

This will go into the cards-that-may-never-be-sent pile, or perhaps the in-case-of-emergency-oops-I-forgot-another-freakin'-card pile.

This little punnkinn {as Mama used to say when I was little} is from Sunshiny Day. It was stamped with StazOn onto a very thick unbleached muslin & colored with Prismacolor pencils.

You can also catch a glimpse of Penelope designer paper and Ribbon.

That's it! And no begging for the rest of the card... I am not listening... laaa laaaa laaa laaa {hands over ears chanting in most childish manner} :)


Next up is one of my submissions for the catalogue designer call last summer... I used sketch #4 from page 11 of the current catalogue. I used the following stamps: Linear Sentiments, More Abundance, and All Occasion Circles. Papers: Rustic Chic designer paper, Bazzill Mono-Browns, and a chartreuse green cardstock from DCWV.

I tried to go outside my typical uber-structured look, and used skewed angles... AND no perfect strips or squares... scary, I know.


That's it for today kids. And for those of you who are in the Wichita, Kansas area and will be attending the Kansas Shrine Bowl game on Saturday... thank you for your support!!

What do you think?

6.09.2009

Creepy Halloweenie Boo Birdhouses...

Tonight I've got the last of my Art Shares! Well, I had an additional one, but I had made one similar and had posted it before HERE... it was for Suzanne. She has a couple of boys and lives in Florida, so I thought it was totally her :) Hope you like it, Suzanne!!

I made these Halloweenie Boo Birdhouses for Bren. She is my downline from Wichita and she said to just surprise her with something... muhuhuwahh
ahh
ahh ahh
aaaaaaahhhh! `:) What was she getting
herself into?!

I LOVE THESE... and I almost wanted to start another project and keep these for myself. But, no no no... I was good and gave them away :) Me... good... ha ha ha... no comments from the peanut gallery...

{cough... CINDY... cough}

Anyway, I had these envisioned stuck in a plant centerpiece... mossy and dark. Or, if you want to go the fun route, in a big bowl of candy corn :)

I'm sorry to say that there isn't ANY product from TAC on this project... that's a first in a LONG time for me! But I am a collector of all that is Halloween and there just isn't any creepy stuff to be had from TAC {HINT HINT HINT} I know... not too subtle, but just in case Mischelle is reading along :)

What is bad, since I am a collector, is that I didn't keep track of some of the manufacturers... sorry guys!

I purchased the wooden mini-birdhouses from Michael's and painted them with green, black, and metallic copper paint. I roughed up some Halloweenie paper (unknown) and glued it to the birdhouses with PVA. I even made some scallop shingles on the roof... see...
cute AND creepy :)

I have no idea where the uber-creepy abso-freakin'-lutely awesome holey trim came from, but I think I'm in love :)

I covered some ugly brown chipboard letters with more paper and inked up the edges.. and then I just started layering! It's hard to see unless you zoom in, but there are these cool Halloweenie transparencies from Little Yellow Bicycle.. a cat and a bat. They are out at the face of the roof while the rest of the schtuff is set back with the face of the house... so they're just kinda hangin'...

me likey.

I found the glittery spiders from a party supply place... yep, they are table confetti... well, maybe not confetti, but cool nevertheless :)

And that's it! Seriously, the pictures are not the greatest because it was cloudy and I had to play with them in PhotoShop... but maybe Bren can take a better photo and post it for me :)

What do you think?